When you register an application in Azure Active Directory (Microsoft Entra ID) and grant it Microsoft Graph application permissions like Mail.Send, it receives a powerful key: by default, it can send emails from any mailbox across your entire Microsoft 365 tenant.
Leaving application permissions wide open poses a significant security risk. If the application credentials are ever compromised, attackers could send phishing or fraudulent emails masquerading as your CEO, CFO, or anyone else in your organization.
To mitigate this threat and follow the principle of least privilege, you can restrict the app’s Mail.Send scope to a specific set of mailboxes. In this guide, we’ll show you how to enforce this security boundary using Exchange Online PowerShell and Application Access Policies.
Prerequisites
Before getting started, make sure you have the following ready:
- The Azure AD App ID: You will need the Application (client) ID of your registered app.
- Exchange Online PowerShell Module: Enforcing these boundaries requires connecting via PowerShell.
- Exchange Administrator Role: You need admin permissions in Exchange Online to create and test access policies.
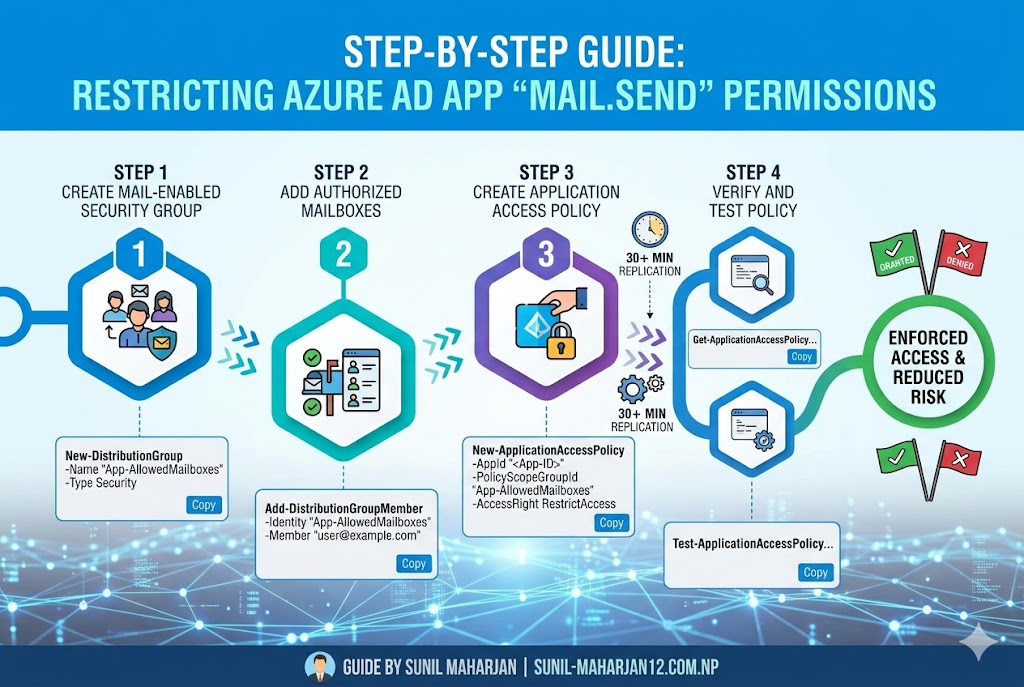
Step 1: Create a Mail-Enabled Security Group
Application Access Policies cannot target individual mailboxes directly; instead, they target a group. We need to create a Mail-Enabled Security Group that will act as the “allow-list” containing the specific mailboxes our app is authorized to use.
- Open PowerShell as an Administrator and connect to your Exchange Online environment:
PowerShell
Connect-ExchangeOnline -UserPrincipalName youradmin@yourdomain.com
Code language: CSS (css)- Run the following command to create the Mail-Enabled Security Group:
PowerShell
New-DistributionGroup -Name "App-MailSend-AllowedMailboxes" -Alias "app-mailsend-allowed" -Type Security
Code language: PHP (php)
Step 2: Add Target Mailboxes to the Security Group
Now, add the specific mailbox (or mailboxes) that the Azure AD application is actually allowed to send emails from.
- To add a single mailbox:
PowerShell
Add-DistributionGroupMember -Identity "App-MailSend-AllowedMailboxes" -Member "targetmailbox@yourdomain.com"
Code language: JavaScript (javascript)- To add multiple mailboxes via a CSV file (if you have a large list): Create a CSV file (e.g.,
mailboxes.csv) with a header namedUserPrincipalNameand execute:
PowerShell
Import-Csv "C:\path\to\mailboxes.csv" | ForEach-Object {
    Add-DistributionGroupMember -Identity "App-MailSend-AllowedMailboxes" -Member $_.UserPrincipalName
}
Code language: PHP (php)
Step 3: Create an Application Access Policy
With your security group configured, you can now create the access policy. This policy links your Azure AD Application ID to your Mail-Enabled Security Group using the RestrictAccess rule.
Run the following command, replacing <Your-Azure-App-ID> with your application’s actual client ID:
PowerShell
New-ApplicationAccessPolicy -AppId "<Your-Azure-App-ID>" -PolicyScopeGroupId "App-MailSend-AllowedMailboxes(Mail-Enabled Security Group)" -AccessRight RestrictAccess -Description "Restrict Mail.Send permissions to specific allowed mailboxes."
Code language: PHP (php)
How it works: Because the
-AccessRightis set toRestrictAccess, the application is explicitly blocked from interacting with any mailbox in the organization unless it belongs to a member of the designated security group.
Step 4: Verify the Application Access Policy
You should verify that the policy was successfully provisioned in your Exchange Online environment by running:
PowerShell
Get-ApplicationAccessPolicy -AppId "<Your-Azure-App-ID>"
Code language: HTML, XML (xml)
This will output details about the policy name, the scope group, and the restriction type, ensuring everything looks correct.
Step 5: Test the Scope Restrictions
Before moving the application to production, it’s critical to test the policy to ensure unauthorized mailboxes are successfully blocked. We use the Test-ApplicationAccessPolicy cmdlet for this.
- Test an Authorized Mailbox (Should return Granted):
PowerShell
Test-ApplicationAccessPolicy -Identity "targetmailbox@yourdomain.com" -AppId "<Your-Azure-App-ID>"
Code language: JavaScript (javascript)
Expected Output: AccessCheckResult : Granted
- Test an Unauthorized Mailbox (Should return Denied):
PowerShell
Test-ApplicationAccessPolicy -Identity "ceo@yourdomain.com" -AppId "<Your-Azure-App-ID>"
Code language: JavaScript (javascript)
Expected Output: AccessCheckResult : Denied
Important Note on Replication Delays
While the Test-ApplicationAccessPolicy cmdlet will show updated results almost instantly, Microsoft Graph REST API calls cache these permissions. It can take anywhere from 30 minutes to over an hour for the mailbox restrictions to fully take effect globally.
If your application tries to send an email using an unauthorized mailbox after the policy propagates, Microsoft Graph will return a 403 Forbidden error with an explicit message indicating access is denied.
Tips
By confining your Azure AD app’s Mail.Send permissions to only the essential mailboxes, you drastically reduce your organization’s attack surface. Implementing Application Access Policies ensures your automation remains secure and compliant without giving away the keys to the entire email kingdom!