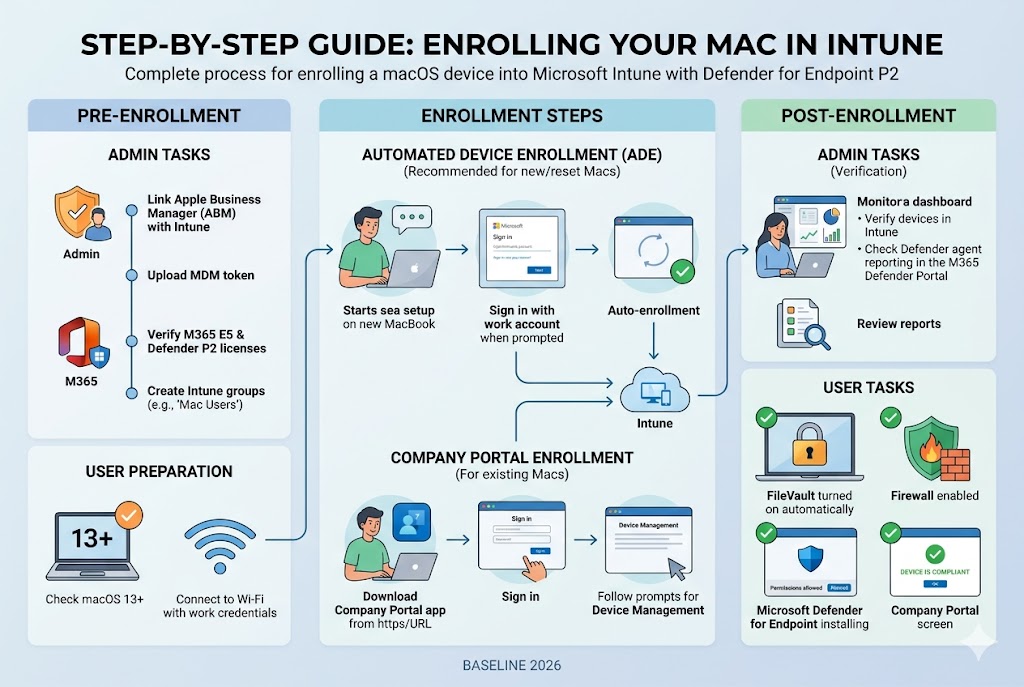
Pre-Enrollment Tasks (Admin Preparation)
Before deploying devices, ensure the underlying cloud infrastructure and licensing are fully configured. (Below configuration based on Microsoft Intune license P1, Entra ID P2, M365 Businesses Basic and Microsoft Defender P2.)
- Link Apple Business Manager (ABM) to Intune
- Log into your Apple Business Manager account.
- Navigate to Preferences > MDM Servers and add Microsoft Intune as a target server.
- Download the public key from Intune and upload it to ABM to establish the handshake.
- Sync the MDM Server Token
- Download the server token (
.p7mfile) from ABM. - Go to the Microsoft Intune Admin Center > Devices > macOS > macOS Enrollment > Enrollment Program Tokens.
- Upload the token to establish the automated sync lifecycle.
- Download the server token (
- Verify Licensing & Seat Assignments
- Confirm that your deployment tier includes Microsoft 365 E5 or standalone Microsoft Defender for Endpoint P2 licenses.
- Ensure licenses are actively assigned to your target deployment users or user groups in Microsoft Entra ID.
- Prepare Intune Deployment Groups
- Create a dynamic or static security group in Entra ID (e.g.,
_all_mac_users_production). - Use this group for scoping configurations, compliance policies, and application deployments.
- Create a dynamic or static security group in Entra ID (e.g.,
II. Enrollment & Configuration Steps (Admin Execution)
Follow these sequential steps to establish your management baseline.
Step 1: Create the ADE Profile in Intune
- Navigate to Devices > macOS > Enrollment Program Tokens.
- Select your active token and click Profiles > Create Profile > macOS.
- Configure the following critical settings:
- User Affinity: Set to Enroll with User Affinity (links the device directly to the user).
- Authentication Method: Select Setup Assistant with modern authentication.
- Supervision: Set to Enabled (locks management capabilities and restricts profile removal).
- Save the profile and assign it to your synchronized ABM hardware assets.
Step 2: Configure the Compliance Policy
- Navigate to Devices > Compliance > Policies > Create Policy > Select macOS.
- Under Device Health & Security, enforce the following:
- FileVault Encryption: Set to Require.
- Firewall: Set to Require/Enabled.
- Minimum OS Version: Set to
13.0.0(Ventura) or later.
- Under Microsoft Defender for Endpoint, select the required risk score level (e.g., Clear or Low).
Step 3: Deploy the Security Baseline
- Navigate to Endpoint Security > Security Baselines > macOS Security Baseline.
- Click Create Profile, name your policy, and customize the core security controls:
- Gatekeeper: Restrict app installations to the App Store and identified developers.
- System Integrity Protection (SIP): Set to Enforced.
- Stealth Mode: Enable to prevent response to ping requests.
Step 4: Package and Deploy Defender for Endpoint P2
- Download the official Microsoft Defender for Endpoint macOS installer package (
.pkg) from the Microsoft 365 Defender portal. - In Intune, go to Apps > macOS > Add > Select Line-of-business app and upload the package.
- Create a Custom Configuration Profile (
.mobileconfig) to apply the corporate payload settings:- Ensure
PassiveModeis set tofalseto activate real-time protection. - Include the necessary System Extensions and Content Filter payloads so the agent doesn’t require user-approved pop-ups for network filtering.
- Ensure
III. Post-Enrollment Tasks (Admin Verification)
- Device Inventory Audit: Verify that newly enrolled devices show up seamlessly under Devices > macOS with a “Compliant” status.
- Security Portal Check: Log into the Microsoft 365 Defender Portal (
security.microsoft.com) and verify that the macOS devices appear in the Device Inventory and are actively sending telemetry. - Remediation Monitoring: Track policy deployment failures and monitor conditional access logs for any blocked corporate connection attempts.
SECTION 2: USER GUIDE
How to Enroll Your Corporate Mac in Microsoft Intune
Welcome to your new corporate Mac! This guide will walk you through setting up your device so it is secure, compliant, and ready for work.
I. Pre-Enrollment (Before You Begin)
- Check Your Software: Ensure your Mac is updated to macOS 13 (Ventura) or a newer version.
- Network Connection: Connect your Mac to a reliable Wi-Fi network.
- Credentials: Have your company email address and password ready.
II. Enrollment Steps (Choose Your Method)
Method A: For Existing/Personal Macs (Company Portal Method)
If you are already using your Mac and just need to add management:
- Open your web browser and go to portal.manage.microsoft.com.
- Sign in using your corporate email address and password.
- Download the Microsoft Company Portal app when prompted.
- Open the downloaded app from your Downloads folder and follow the on-screen instructions.
- Click Install to allow your company’s security profile to register on your system.
Method B: For New or Reset Macs (Automated Setup Method)
If your Mac is brand new out of the box or has just been completely reset:
- Turn on your Mac and select your region and keyboard layout.
- Connect to your local Wi-Fi network.
- When the Remote Management screen appears, read the prompt and click Continue.
- Enter your corporate email address and password when prompted by the Microsoft login window.
- Let the Setup Assistant finish configuring your desktop. Intune will configure itself automatically in the background.
III. Post-Enrollment Tasks (What to Expect)
Once enrollment is complete, The Mac will automatically configure its security settings. You do not need to manually configure these, but you must allow them to run:
- FileVault Encryption: A pop-up will ask you or user to enable FileVault encryption. Click encrypt.
- Note: Your recovery key is securely stored by IT Admin; User do not need to write it down.
- Network Firewall: The system firewall will turn on automatically. Please do not attempt to disable it in your Settings app.
- Microsoft Defender Security: The Microsoft Defender anti-malware application will silently install. If your Mac prompts you with a window asking to “Allow System Extensions” or “Allow Network Filtering”, please click Allow.
- Compliance Status: Open your Company Portal application at any time to verify your status. A green checkmark saying “Device is compliant” means you are fully set up and ready to access corporate apps (like Outlook and Teams).
BEST PRACTICES FOR SUCCESS
For IT Administrators: Always roll out new configuration profiles, OS updates, or Defender changes to a designated Pilot Group (5–10 users) for 48 hours before pushing them to the entire production environment.
For Mac Users: Do not uninstall the Company Portal or Microsoft Defender applications. Removing these applications will cause your device to fail compliance checks, which will instantly block your access to work email, Teams, and internal systems.