Before You Begin: Key Planning Points
Before starting the deployment, please review these important considerations to ensure success:
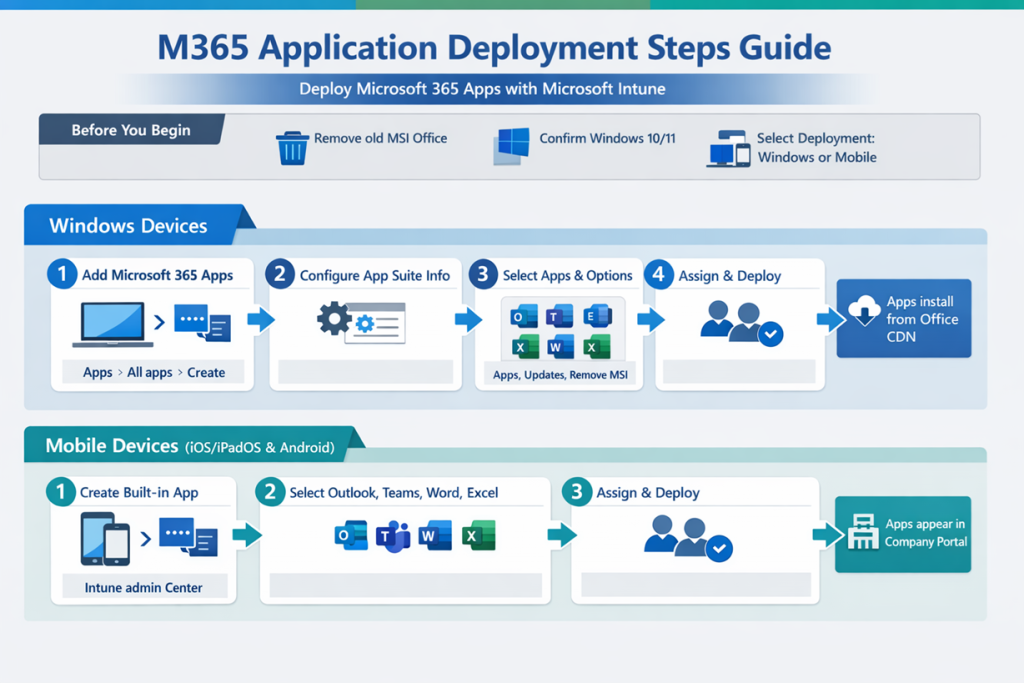
- Remove Old MSI Versions: If target Windows devices have older, MSI-based versions of Office (e.g., Office 2016), you must enable the “Remove MSI” option in Intune. The new Click-to-Run version of Microsoft 365 Apps will fail to install if an MSI version is present .
- License Requirement: Users must be assigned a valid Microsoft 365 Apps license (e.g., Microsoft 365 Business Premium, E3, or E5) .
- Windows Version: Target Windows devices must be running the Windows 10/11 Creators Update or later .
- Deployment Method: For deployment to Windows devices, you will use the Microsoft 365 Apps (Windows 10 and later) app type. For mobile devices, you will use the Built-In App type .
Part 1: Deploy to Windows Devices (via Intune)
This method installs the full Microsoft 365 desktop apps (Word, Excel, Outlook, PowerPoint, etc.) on managed Windows 10/11 PCs.
Step 1: Add the Microsoft 365 Apps Suite
- Sign in to the Microsoft Intune admin center .
- Go to Apps > All apps > Create .
- In the Select app type pane, under Microsoft 365 Apps, select Windows 10 and later .
- Click Select. The “Add Microsoft 365 Apps” wizard will open.
Step 2: Configure the App Suite Information
On the App suite information page, configure the details users will see in the Company Portal:
- Suite Name: A unique name for the deployment (e.g., “Microsoft 365 Apps for Enterprise”) .
- Suite Description: A description of the apps included.
- Category: Select one or more categories (e.g., “Productivity”) to help users find the app .
- Show this as a featured app: Optionally, highlight the suite in the Company Portal.
- Click Next to continue.
Step 3: Configure the App Suite Settings (Configuration Designer)
This is where you define which apps and settings to deploy.
- On the Configure app suite page, ensure the Configuration settings format is set to Configuration designer .
- Under Configure app suite, make your selections:
- Select Office apps: Choose the standard apps to install (Word, Excel, PowerPoint, Outlook, etc.) .
- Select other Office apps (license required): Add Project Online or Visio Online if you have the licenses .
- Architecture: Select 64-bit (recommended for most devices) or 32-bit .
- Update Channel: Choose how often Office updates (e.g., Monthly Enterprise Channel for maximum stability) .
- Remove MSI from end-user devices: Set to Yes to automatically uninstall any older MSI-based Office versions .
- Use shared computer activation: Enable if the devices are shared by multiple users (e.g., a hospital ward or factory floor) .
- Automatically accept the app end user license agreement: Set to Yes to prevent users from being prompted .
- Languages: Office automatically installs with Windows’ system languages. Click Languages to add more if needed .
- Click Next to go to the Scope tags page (optional) and then Next again to reach the Assignments page.
Step 4: Assign the App
- On the Assignments page, under the Required section, click Add group .
- Search for and select the Azure AD groups (containing users or devices) that should receive Microsoft 365 Apps .
- Click Next to proceed to the Review + create page.
- Review all settings and click Create to start the deployment.
Intune will now instruct targeted devices to download and install Microsoft 365 Apps from the Office Content Delivery Network (CDN) in the background .
Part 2: Deploy to Mobile Devices (iOS/iPadOS & Android)
For mobile devices, you deploy the individual Microsoft 365 apps (Outlook, Teams, Word, etc.). These apps are installed from the official store (Apple App Store or Google Play Store) but managed by Intune .
Step 1: Add a Built-In App
- In the Microsoft Intune admin center, go to Apps > All apps > Create .
- In the Select app type pane, under Other types, select Built-In App.
- Click Select.
Step 2: Select the Apps
- On the Select Built-in apps page, click Select app .
- In the pane that opens, check the box for each Microsoft 365 app you want to deploy (e.g., Microsoft Excel, Microsoft Outlook, Microsoft Teams).
- Click Select to confirm your choices.
- Click Next to go to the Scope tags page (optional) and then Next again.
Step 3: Assign and Deploy
- On the Assignments page, under the Required section, click Add group.
- Select the user or device groups that should receive these mobile apps.
- Click Next > Review + create > Create .
The selected apps will now appear as required installs in the Company Portal for targeted mobile users.